HD to SD Challenge

amendegw wrote on 11/24/2010, 1:24 PM
All,

There's been much discussion recently about how to downrez HD source for SD DVD production. I propose a challenge (I'd call it a contest, but there's no prizes).

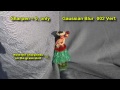
I shot a short, 10 sec clip under (what I thought) were the worst conditions for downrezzing HD to SD: a stationary figure with a a moving, high contrast, fine detailed background. The clip is 1920x1080 60i AVCHD. The Challenge is to get the best balance of sharpness while eliminating the flicker in the background.

I tried to downrez this clip and got good sharpness, but horrible flicker/moire patterns by adding the Sharpen FX = zero. Adding a Vertical Gaussian Blur of .002 minimized the flicker/moire, but caused too much loss of resolution in the central figure. I uprezzed the results to 720p and sent them to YouTube:


So, here's the rules of the Challenge:

1) Download and start with the clip in this link: AVCHD.zip
2) Render the clip to an NTSC 720x480 Widescreen format for import to DVDA.
3) All work must be done within Vegas.
4) Render to an intermediate format is okay.
5) Masking and/or keyframing are not allowed.
6) The objective is to get the best resolution while eliminating the flicker.
7) If you are tempted to post, "Can't be done" or "start with a different format" or something similar, please don't post a reply.
8) Uprez the results of your efforts to the web and post the link in this thread (YouTube is nice because it can be embedded, but any web link is okay).
9) Tell us how you accomplished the results - Workflow, FX's applied, Project Settings, Render settings, etc.

Any takers?
...Jerry

System Model: Alienware Area-51m R2
System: Windows 11 Home
Processor: Intel(R) Core(TM) i7-10700K CPU @ 3.80GHz, 3792 Mhz, 8 Core(s), 16 Logical Processor(s)
Installed Memory: 64.0 GB
Display Adapter: NVIDIA GeForce RTX 2070 Super (8GB), Nvidia Studio Driver 527.56 Dec 2022)
Overclock Off

Display: 1920x1080 144 hertz
Storage (12TB Total):
OS Drive: PM981a NVMe SAMSUNG 2048GB
Data Drive1: Samsung SSD 970 EVO Plus 2TB
Data Drive2: Samsung SSD 870 QVO 8TB

USB: Thunderbolt 3 (USB Type-C) port Supports USB 3.2 Gen 2, DisplayPort 1.2, Thunderbolt 3

Cameras:
Canon R5
Canon R3
Sony A9

Comments

farss wrote on 11/24/2010, 1:30 PM
Cannot download the clip, link is...

Bob.
amendegw wrote on 11/24/2010, 1:42 PM
Okay, I fixed the link (and you should NOT "save target as".)

Sorry,
...Jerry

System Model: Alienware Area-51m R2
System: Windows 11 Home
Processor: Intel(R) Core(TM) i7-10700K CPU @ 3.80GHz, 3792 Mhz, 8 Core(s), 16 Logical Processor(s)
Installed Memory: 64.0 GB
Display Adapter: NVIDIA GeForce RTX 2070 Super (8GB), Nvidia Studio Driver 527.56 Dec 2022)
Overclock Off

Display: 1920x1080 144 hertz
Storage (12TB Total):
OS Drive: PM981a NVMe SAMSUNG 2048GB
Data Drive1: Samsung SSD 970 EVO Plus 2TB
Data Drive2: Samsung SSD 870 QVO 8TB

USB: Thunderbolt 3 (USB Type-C) port Supports USB 3.2 Gen 2, DisplayPort 1.2, Thunderbolt 3

Cameras:
Canon R5
Canon R3
Sony A9

musicvid10 wrote on 11/24/2010, 3:24 PM
Feeling a bit sadistic, Jerry?
PerroneFord wrote on 11/24/2010, 3:58 PM
Ok,

So I did it. But here's my problem. You want us to prep it for DVD with DVDA. Fine. But if I then put that on the web, I'd be NUTS to not use a better format (mp4 or wmv) because youtube is going to turn the Mpeg2 to mush.

Now if you want me to upload an mpg4 to Youtube, no problem.
TeetimeNC wrote on 11/24/2010, 4:00 PM
Jerry, if this were shot in 1080p30 or 720p60 would you expect less problem downrezzing to DVD? The reason I ask is over in dvxuser the overwhelming concensus in a recent discussion was never shoot HD interlaced unless you are required by the client (e.g., a broadcaster). I would think the interlacing really amplifies the flicker.

/jerry
PerroneFord wrote on 11/24/2010, 4:02 PM
Here's one you can download:

http://exposureroom.com/89f17008799e448d967f1b6f6f56cd75/

Password is: test

That's a DVDA Mpeg2, recompressed for the web.
amendegw wrote on 11/24/2010, 4:07 PM
"Feeling a bit sadistic, Jerry?"Ha!! Yeah, this may be an exercise in futility, however, just maybe someone (smarter-than-I) has figured this out.

On the other hand, maybe Sony is reading these threads and recognizes there's a great need for feature for an easy/foolproof method for HD to SD downrez. Vegas 11?

Or maybe, a third party vendor sees dollar signs (or Euros) and creates a whiz-bang downrez plugin.

I'm hoping someone has already figured this out.

...Jerry (aka Marquis de Sade)

System Model: Alienware Area-51m R2
System: Windows 11 Home
Processor: Intel(R) Core(TM) i7-10700K CPU @ 3.80GHz, 3792 Mhz, 8 Core(s), 16 Logical Processor(s)
Installed Memory: 64.0 GB
Display Adapter: NVIDIA GeForce RTX 2070 Super (8GB), Nvidia Studio Driver 527.56 Dec 2022)
Overclock Off

Display: 1920x1080 144 hertz
Storage (12TB Total):
OS Drive: PM981a NVMe SAMSUNG 2048GB
Data Drive1: Samsung SSD 970 EVO Plus 2TB
Data Drive2: Samsung SSD 870 QVO 8TB

USB: Thunderbolt 3 (USB Type-C) port Supports USB 3.2 Gen 2, DisplayPort 1.2, Thunderbolt 3

Cameras:
Canon R5
Canon R3
Sony A9

David Newman wrote on 11/24/2010, 4:19 PM
While I feel I have done better, so much is lost in the web encoding by youtube


I did not follow the rules as I convert and scaled in HDLink to CineForm AVI first.

-David
amendegw wrote on 11/24/2010, 4:24 PM
"So I did it. But here's my problem. You want us to prep it for DVD with DVDA. Fine. But if I then put that on the web, I'd be NUTS to not use a better format (mp4 or wmv) because youtube is going to turn the Mpeg2 to mush.Okay, maybe I wasn't very explicit in the original posting. What I did in my test was to take the original clip, apply fixes and render to "DVD Architect NTSC Widescreen video stream". I then took that clip and created a new project with NTSC Widescreen properties. I then rendered that project to YouTube friendly Sony AVC, Internet 1280x720-30p. That is, I uprezzed it to Internet friendly 720p. Using this procedure, you can view all the problems associated with the downrezz, but still view it on-line. Yeah, there was some loss in the second render, but we can still see the results of the first render.

Obviously, an interlaced upload to YouTube would be problematic. However, if you created a link to the .mpg file that could be downloaded and viewed, that would work, too.

Make sense?
...Jerry

System Model: Alienware Area-51m R2
System: Windows 11 Home
Processor: Intel(R) Core(TM) i7-10700K CPU @ 3.80GHz, 3792 Mhz, 8 Core(s), 16 Logical Processor(s)
Installed Memory: 64.0 GB
Display Adapter: NVIDIA GeForce RTX 2070 Super (8GB), Nvidia Studio Driver 527.56 Dec 2022)
Overclock Off

Display: 1920x1080 144 hertz
Storage (12TB Total):
OS Drive: PM981a NVMe SAMSUNG 2048GB
Data Drive1: Samsung SSD 970 EVO Plus 2TB
Data Drive2: Samsung SSD 870 QVO 8TB

USB: Thunderbolt 3 (USB Type-C) port Supports USB 3.2 Gen 2, DisplayPort 1.2, Thunderbolt 3

Cameras:
Canon R5
Canon R3
Sony A9

farss wrote on 11/24/2010, 4:28 PM
" I would think the interlacing really amplifies the flicker."

Generally quite the opposite. When shooting interlaced good cameras use line pair averaging to reduce vertical resolution and improve noise. Converting progressive HD to SD Interlaced is a big challenge, just look at the number of posts regarding issues using HiRes stills.

Bob.

amendegw wrote on 11/24/2010, 4:40 PM
@PerroneFord: I'm impressed! What are your secrets? FX's, project settings, render settings, etc.

...Jerry

System Model: Alienware Area-51m R2
System: Windows 11 Home
Processor: Intel(R) Core(TM) i7-10700K CPU @ 3.80GHz, 3792 Mhz, 8 Core(s), 16 Logical Processor(s)
Installed Memory: 64.0 GB
Display Adapter: NVIDIA GeForce RTX 2070 Super (8GB), Nvidia Studio Driver 527.56 Dec 2022)
Overclock Off

Display: 1920x1080 144 hertz
Storage (12TB Total):
OS Drive: PM981a NVMe SAMSUNG 2048GB
Data Drive1: Samsung SSD 970 EVO Plus 2TB
Data Drive2: Samsung SSD 870 QVO 8TB

USB: Thunderbolt 3 (USB Type-C) port Supports USB 3.2 Gen 2, DisplayPort 1.2, Thunderbolt 3

Cameras:
Canon R5
Canon R3
Sony A9

amendegw wrote on 11/24/2010, 4:46 PM
@dan: Also quite impressive. Do I understand that HDLink is part of the neoHD product? not included in neoScene?

...Jerry

System Model: Alienware Area-51m R2
System: Windows 11 Home
Processor: Intel(R) Core(TM) i7-10700K CPU @ 3.80GHz, 3792 Mhz, 8 Core(s), 16 Logical Processor(s)
Installed Memory: 64.0 GB
Display Adapter: NVIDIA GeForce RTX 2070 Super (8GB), Nvidia Studio Driver 527.56 Dec 2022)
Overclock Off

Display: 1920x1080 144 hertz
Storage (12TB Total):
OS Drive: PM981a NVMe SAMSUNG 2048GB
Data Drive1: Samsung SSD 970 EVO Plus 2TB
Data Drive2: Samsung SSD 870 QVO 8TB

USB: Thunderbolt 3 (USB Type-C) port Supports USB 3.2 Gen 2, DisplayPort 1.2, Thunderbolt 3

Cameras:
Canon R5
Canon R3
Sony A9

amendegw wrote on 11/24/2010, 4:55 PM
"if this were shot in 1080p30 or 720p60 would you expect less problem downrezzing to DVD? The reason I ask is over in dvxuser the overwhelming concensus in a recent discussion was never shoot HD interlaced unless you are required by the client (e.g., a broadcaster). I would think the interlacing really amplifies the flicker."/jerry,

I didn't want to confuse the original post, but I duplicated this test with a clip in Canon's PF30 mode (30p in a 60i wrapper), and saw no difference in the results. I have a 720p camera that actually records in progessive, but didn't test it.

...Jerry

System Model: Alienware Area-51m R2
System: Windows 11 Home
Processor: Intel(R) Core(TM) i7-10700K CPU @ 3.80GHz, 3792 Mhz, 8 Core(s), 16 Logical Processor(s)
Installed Memory: 64.0 GB
Display Adapter: NVIDIA GeForce RTX 2070 Super (8GB), Nvidia Studio Driver 527.56 Dec 2022)
Overclock Off

Display: 1920x1080 144 hertz
Storage (12TB Total):
OS Drive: PM981a NVMe SAMSUNG 2048GB
Data Drive1: Samsung SSD 970 EVO Plus 2TB
Data Drive2: Samsung SSD 870 QVO 8TB

USB: Thunderbolt 3 (USB Type-C) port Supports USB 3.2 Gen 2, DisplayPort 1.2, Thunderbolt 3

Cameras:
Canon R5
Canon R3
Sony A9

David Newman wrote on 11/24/2010, 5:00 PM
Jerry, yes HDLink is in NeoHD or above. NeoScene doesn't include a scaler, so I don't do it so simply.

-David
PerroneFord wrote on 11/24/2010, 5:25 PM
What fun would it be if I told you that?

I did this in Sorenson Squeeze first to see what it could do without any prep. Then I did the rest in Vegas using workflows I've talked about here and in other forums for years now.

Fundamentally, give Vegas good codecs, don't try to do everything in one pass, and give your project as much bandwidth in Mpeg-2 as you can. I always get decent results that way.

TeetimeNC wrote on 11/24/2010, 5:52 PM
>Generally quite the opposite. When shooting interlaced good cameras use line pair averaging to reduce vertical resolution and improve noise. Converting progressive HD to SD Interlaced is a big challenge, just look at the number of posts regarding issues using HiRes stills.

Bob, you are probably correct - I only have anecdotal evidence that was the basis for my comment. But a few days ago someone suggested for 1080p30 to just drop this into a 1080i60 project and render for DVD using the standard DVDA template - I think each field is then a downrezzed 1920x1080 frame with no interlacing required (I may be wrong on this).

I recently did this and was quite pleased with the result, but I didn't have anything nearly as challenging as the example in this thread. Also, it is quite possible I'm not as discriminating as others of you here ;-).

/jerry
amendegw wrote on 11/24/2010, 6:15 PM
@PerroneFord: I need you to hold my hand more on this. In searching this forum, I gathered that you got your best results (w/o using Sorenson Squeeze) by:

"4. Render HDV file to IMX 50 Widescreen .MXF file. Then bring THAT into Vegas, turn on deinterlace (interpolate) and render to DVDA Widescreen with good bit rate.I don't understand "IMX 50 Widescreen .MXF". I found a "HD422 1920x1080-60i 50 Mbps" format and used it. I then imported this into a NTSC 720x480 Widescreen project (w/ Interpolate) and rendered it using the MainConcept "DVD Architect NTSC Widescreen video stream", changing the render to 2-pass & maxing out the bitrates.

My resulting render was better, but still had the flickering/moire problems.

Please enlighten me.

...Jerry

System Model: Alienware Area-51m R2
System: Windows 11 Home
Processor: Intel(R) Core(TM) i7-10700K CPU @ 3.80GHz, 3792 Mhz, 8 Core(s), 16 Logical Processor(s)
Installed Memory: 64.0 GB
Display Adapter: NVIDIA GeForce RTX 2070 Super (8GB), Nvidia Studio Driver 527.56 Dec 2022)
Overclock Off

Display: 1920x1080 144 hertz
Storage (12TB Total):
OS Drive: PM981a NVMe SAMSUNG 2048GB
Data Drive1: Samsung SSD 970 EVO Plus 2TB
Data Drive2: Samsung SSD 870 QVO 8TB

USB: Thunderbolt 3 (USB Type-C) port Supports USB 3.2 Gen 2, DisplayPort 1.2, Thunderbolt 3

Cameras:
Canon R5
Canon R3
Sony A9

farss wrote on 11/24/2010, 6:15 PM
Here's my effort:


I stuck to the rules.
To keep this challenge meaningfull I would have liked to have seen footage from a top shelf 16:9 SD camera shooting the same scene side by side with the HD camera. I rather suspect the outcome would have also had serious issues.

Faced with this challenge personally I would have masked the doll.

Bob.
johnmeyer wrote on 11/24/2010, 6:25 PM
Curse you amendegw for putting up this challenge. I just killed an hour trying to finally wrestle this one to the ground.

Actually, all kidding aside, I am extremely glad you posted this, and thank you for the intriguing test file. There have been so many posts on this subject, especially the past few weeks, and many of these are filled with all sorts of bad information, usually based on supposition, superstition, and fallacies repeated from other posts (such as the idea that somehow everything needs to be de-interlaced, as if interlacing is some sort of “bad” thing).

Shooting interlaced and delivering interlaced is a really good thing to do if you are putting your video on DVD. Uploading to the web is a different story. Your challenge explicitly states:

"downrez HD source for SD

Uploading to the web creates a completely different set of problems, and necessitates a different workflow.

Now, down to the challenge.

Methodology

I put the video on the timeline in Vegas 8.0c (I could have used Vegas 10.0a, but I am infinitely more familiar with 7.0d and 8.0c). I used the “match” feature in the Properties window to make sure the project matched the test clip exactly. I changed “ Full-resolution rendering quality” to “Best,” just so I wouldn’t have to remember to change it when rendering. I set De-interlace method in the project properties to “Interpolate Fields.”

I did not change the clip properties at all.

I then did an initial render to MPEG-2 using the “DVD Architect NTSC Widescreen video stream” as the starting point. I then changed the following items in this template (the video rendering quality was already set to “Best” because of how I set the project properties):

1. I checked Two-pass
2. I set Variable bitrate Max to 8,300,000; Average to 7,000,000; and Min to 192,000.
3. I changed the DC-coefficient to 10-bit.

I then rendered the clip.

I then played with three variables and rendered out various permutations using these same settings. The settings I played with were:

Sharpen fx added to the event, set to zero, with Pre/Post toggle set to Pre
Sharpen fx added to the event, set to zero, with Pre/Post toggle set to Post
Event pan/crop set to match the NTSC widescreen properties, in order to prevent slight black bars

Here are the permutations:

Pan/Crop AVCHD aspect
Pan/Crop to NTSC widescreen aspect
Pan/Crop to NTSC widescreen aspect, sharpen fx 0, Post
Pan/Crop to NTSC widescreen aspect, sharpen fx 0, Pre
Pan/Crop AVCHD aspect, sharpen fx 0, Pre
Pan/Crop AVCHD aspect, sharpen fx 0, Post

I lined these all up on the Vegas timeline, under the original AVCHD, and changed the project properties to “NTSC DV Widescreen (720x480, 29.970 fps)” and made sure the preview resolution was set to Best Full. I solo’d each track and moved the tracks up and down until I had the tracks in the order of which provided the best still display on the computer monitor. Obviously this is not the right way to judge the results, but it was a starting point.

I then put all the MPEG-2 renders into DVD Architect and burned a temporary DVD. I viewed this DVD on a Sony Wega Trinitron, i.e., a real CRT interlaced monitor. I looked at each clip several times and noted issues and problems.

Oh, and one thing I forgot to mention. I also created one clip using an “exotic” workflow that involves serving the video into an AVISynth script and then encoding this using the external (purchased) version of the MainConcept MPEG-2 encoder.

I have uploaded the MPEG-2 files to an ftp site so you can play with them yourself. It is my opinion that any upload to YouTube (or Vimeo) is a pointless exercise because no one really knows precisely what these sites do to the video, and if nothing else, they certainly change it to progressive, which is a completely unnecessary step. As already noted, if your goal is to create a DVD, which is the stated goal in the first sentence of the initial post, you do not want to deinterlace.

Oh, and please don’t bother to add that if I want to watch on an LCD TV that I need to deinterlace, because that isn’t true. Please, everyone, just let your TV set deal with the interlacing because most of them do a really good job of this.

Here are the results and conclusions.

1. No matter what, this particular test file exhibits moiré patterns. There is absolutely nothing that can be done about this and is a basic law of physics when you have closely spaced, orthogonal lines. So, don’t get hung up worrying about something that cannot be changed. This is NOT an interlacing artifact, per se, although depending on a thousand variables, you may see more or less of this with progressive vs. interlaced on a particular clip (or vice versa), simply because of the “chance” of how the beat patterns are formed at different resolutions. The moiré seen in the upper-right quadrant of this clip is pretty nasty when viewed on an NTSC interlaced CRT monitor.

2. The difference between rendering with the NTSC pan/crop applied at the event level and not doing this only affects whether there are bars in the final output. It did not affect the quality of the output in any other way. Since you don’t want to have bars, I strongly recommend always applying the correct pan/crop to all events. For this clip, the correct pan/crop is Width: 1920 and Height: 1056.

3. The big surprise to me was the difference between the sharpen=0 fx with the toggle set to Pre compared to the toggle set to Post. When set to Post, the sharpen fx is significant and obvious. However, in addition to the sharpening, this fx also appears to change the levels. I had never noticed this before, but it seems to stretch the levels so they go all the way to 255 and down to 0. Thus, in addition to the sharpening, it increases the contrast. I tried playing with Levels to try to compensate for this, but was unable to make the video look correct. I tried increasing the sharpening setting beyond zero while looking at the scopes, and saw that the “problem” increases with more sharpening, so perhaps this is just an artifact of adding the “ringing” to the light/dark transitions, which is what sharpening does. You can see this in the videoscopes.

4. What you cannot see in the preview window or videoscopes display is the difference between pre and post when the video gets rendered and then displayed on a CRT when playing the DVD. With Post, the video is sharpened significantly. This is not subtle, even with sharpen set to zero. It certainly makes the model doll appear to have a lot more detail, but of course makes the moiré pattern more annoying. For non-pathological test cases, and for many viewers accustomed to NTSC sharpened video, this Post- setting may provide the “best” results simply because it looks like SD video has always looked. However, when you set the fX to Pre, the sharpening artifacts disappear completely. At first, it looks like the fX has been rendered useless, but when watching the video on the NTSC CRT monitor, it quickly became apparent, by looking at the static portion of cloth going out to the lower right from the doll’s feet, that resolution is subtly better. Thus, if you want actual better resolution, but without the artifacts of sharpening, this is the way to go.

5. Finally, my external process using AVISynth did produce the best results, but only by a very slight margin when compared to the Sharpen fX set to 0 and pre, with pan/crop set to crop to NTSC Widescreen aspect ratio.

Summary

If I were writing a cookbook for how to get the best NTSC DVD Widescreen video from 1920x1080 AVCHD (and probably 1440x1080 HDV), here is what I would recommend:

1. Use the “match” feature in the Properties window to make sure the project matches your video exactly.

2. In the Project Properties dialog, change “ Full-resolution rendering quality” to “Best,” and set De-interlace method in the project properties to “Interpolate Fields.”

3. Set the Pan/Crop for each event to 1920x1056.

4. Add the Sharpen fX to each event and set the sharpening amount to zero. Set the pre/post toggle to Post if you want a strong sharpening effect that will mimic what “old-fashioned” SD video looks like. Set it to Pre if you want the video to have slightly better resolution (than you would get with no Sharpen fX at all) without the obvious sharpening artifacts.

5. You can do #3 & #4 on the first event, and then use Copy and then Paste Attributes to propagate these settings to all other events on the timeline. Do this before you do anything else or else you will screw up your existing pan/crop and fX settings. A good multi-purpose script program like Excalibur or Ultimate S gives you even more flexibility as to when and how you change these settings.

I can provide the AVISynth script and workflow if anyone wants, but this particular thread is about doing everything in Vegas.

Finally, everyone needs to understand that when reducing resolution of things that have hard lines -- especially something like this nasty test file -- you are going to see artifacts simply because of the physics involved.

Oh, and if I had infinite time, the other variable that would be interesting to play with would be the “Blend” vs. “Interpolate” deinterlace setting in the project properties. I don’t think this test clip would reveal much about the differences. I would instead like to use one of my favorites, namely a basketball game, where the players are moving, the camera is moving, and the lines on the floor, which are straight as well as curved, are going in all directions. I find that it is a really good test of real-world video.

But that is for another day.

Here is the link to my MPEG-2 files:

John Meyer’s MPEG-2 Test Files

Because there was no difference in the files that were not scaled to NTSC Widescreen aspect ratio, I did not include those files in order to reduce the file size (this is 58 MB).


amendegw wrote on 11/24/2010, 6:31 PM
Bob,

Certainly better than my efforts. How did you do it?

...Jerry

PS: Yeah, masking would have made this short clip much better, but the reason I suggested a rule against it is because it could get quite complicated/timeconsuming to convert a 90 min video.

PPS: You're correct, an true SD comparison would have been informative. I may give that a try tomorrow (assuming the lighting is not way off).

System Model: Alienware Area-51m R2
System: Windows 11 Home
Processor: Intel(R) Core(TM) i7-10700K CPU @ 3.80GHz, 3792 Mhz, 8 Core(s), 16 Logical Processor(s)
Installed Memory: 64.0 GB
Display Adapter: NVIDIA GeForce RTX 2070 Super (8GB), Nvidia Studio Driver 527.56 Dec 2022)
Overclock Off

Display: 1920x1080 144 hertz
Storage (12TB Total):
OS Drive: PM981a NVMe SAMSUNG 2048GB
Data Drive1: Samsung SSD 970 EVO Plus 2TB
Data Drive2: Samsung SSD 870 QVO 8TB

USB: Thunderbolt 3 (USB Type-C) port Supports USB 3.2 Gen 2, DisplayPort 1.2, Thunderbolt 3

Cameras:
Canon R5
Canon R3
Sony A9

PerroneFord wrote on 11/24/2010, 6:33 PM
Ok, here's how I did it.

I transcoded to a Lagarith/AVI file using Prism. A free conversion program. This converted it to a progressive, 1080/60.

Brought the new file file into Vegas. Applied Magic Bullet Looks and color corrected and fixed the luma ranges. Applied a telecine net filter which takes the sharp edges off but leaves the detail. There are numerous ways to do this, but I find this one works best. A slight denoise with another plugin would do something much the same.

Scaled the file down to 720x405 again saving into the lossless Lagarith codec.

Checked the results and it was still very clean without much moire or aliasing.

Did a 2-pass VBR encode into Mpeg2 using 9.5k/9.2k/9.0k for my max/avg/min settings.

Checked the results and it still looked decent. Uploaded to ExposureRoom and prayed it wouldn't make a mess of it. It didn't. I don't think I would get the same results on Youtube.

There ya go.

Basically, use good codecs, don't do too much in one step, be patient, use the highest bitrates you can at each step.


Brought that into Vegas. Rendered
ushere wrote on 11/24/2010, 6:46 PM
keeping an exceptionally low profile ;-)

while i fully appreciate our general aim for perfection, i have to question how many of our end users (ie. general viewers NOT pro's) would even notice the subtle difference between one method and another?

and, as for youtube, i would suspect that the whole process done through vegas text-book style would probably give a product that stood head and shoulders above the generally appalling quality to be usually found there....

amendegw wrote on 11/24/2010, 6:47 PM
@johnmeyer: Wow! What an analysis! It will take some time for me to thoroughly understand it and attempt to recreate your process. Hope to do that tomorrow (but it's Thanksgiving - we'll see). In the meantime, I had trouble with your link, but I think I sussed it out and this should work: John Meyer’s MPEG-2 Test Files

Much thanks for this analysis!!

...Jerry

System Model: Alienware Area-51m R2
System: Windows 11 Home
Processor: Intel(R) Core(TM) i7-10700K CPU @ 3.80GHz, 3792 Mhz, 8 Core(s), 16 Logical Processor(s)
Installed Memory: 64.0 GB
Display Adapter: NVIDIA GeForce RTX 2070 Super (8GB), Nvidia Studio Driver 527.56 Dec 2022)
Overclock Off

Display: 1920x1080 144 hertz
Storage (12TB Total):
OS Drive: PM981a NVMe SAMSUNG 2048GB
Data Drive1: Samsung SSD 970 EVO Plus 2TB
Data Drive2: Samsung SSD 870 QVO 8TB

USB: Thunderbolt 3 (USB Type-C) port Supports USB 3.2 Gen 2, DisplayPort 1.2, Thunderbolt 3

Cameras:
Canon R5
Canon R3
Sony A9

farss wrote on 11/24/2010, 6:49 PM
"The big surprise to me was the difference between the sharpen=0 fx with the toggle set to Pre compared to the toggle set to Post"

This is expected behaviour. Adding detail before downscaling pushes right up against the Nyquist limit and hence you add to the aliasing problems. It is critical this is done post scaling. It's also the reason most of us lucky enough to have the option turn Detail down in our cameras.


"However, in addition to the sharpening, this fx also appears to change the levels."

It doesn't alter the levels of the actual video. What happens is it adds detail to the edges that goes from Y' = 0 to 255. In a scene with lots of fine edges like this one it would appear on the scopes like all the levels had been shifted. To prove to yourself what I'm saying try it with some gen media with just one edge.

Bob.